|
Product Bulletin 4: Spray Rails - 06/28/2006 (scroll down / see below)
Product Bulletin 3: Supplied Pressure Gauge -11/28/2001 (see below) Product Bulletin 2: Hull cap zipper safety backup - 11/20/1998 (below) Product Bulletin 1: Full Lotus Floats with SACS* - 09/01/1995 (below) * Note: You will require Acrobat Reader on your computer to open some of these bulletins. If you do not have Acrobat Reader, you can download it free, click on the button graphic below. |
Product Bulletin 4: Spray Rails
Issued: June 28, 2006 - (Does not affect floats manufactured after 2006)
ATTENTION FULL LOTUS DEALERS AND CUSTOMERS June 28, 2006
It has come to the attention of Full Lotus Mfg. That the spray rails that are supplied with the larger floats and optional on our smaller floats, tend to crack and break over time. Or if they are ran up against an object.
It is our goal to provide a top quality product and there fore the current spray rails will no longer be available effective immediately on all orders, including orders already placed but not shipped.
We have also found through testing that the design of the Full Lotus floats really does not need a spray rail and therefore this is not a concern. 99% of Full Lotus floats do not have spray rails on them.
We apologize if this is an inconvenience for some of our customers however we must do what is best for the product.
Product Bulletin 3: Supplied Pressure Gauge
Issued: November 28, 2001 - (Does not affect floats manufactured after 2001)
ATTENTION FULL LOTUS DEALERS AND CUSTOMERS Nov. 28/01
It has come to our attention that in some cases the low pressure gauge we supply with new floats, is not reading to manufacturer's specifications.
Please ensure that your gauge is reading accurately prior to inflating your Full Lotus floats. The floats should be inflated to the operating pressures outlined in the Float Operator's Manual and printed on the float shells. This pressure range is 1.5 psi to 2.25 psi. The only exception to this are the SACS (Step Anti Compression System) bladders installed on all large floats, FL 1650 and larger, and optional on the smaller models. The SACS bladders are designed to hold an operating pressure of 15 psi.
Do not use the low pressure gauge currently supplied with your floats to test your high pressure SACS bladders. A reading higher than 15 psi on this low pressure gauge will cause this gauge to seize and be of no further use.
Ensure that the low pressure gauge is not mishandled or dropped as this can also damage the gauge and lead to a faulty reading.
If you have any concerns or questions, do not hesitate to contact Full Lotus directly.
Sincerely,
Full Lotus Manufacturing
Product Bulletin 2: Hull cap zipper safety backup
Issued: November 20, 1998 - (Does not affect floats manufactured after 1998)
Models affected: All
Topic: Hull cap zipper safety back-up
INTRODUCTION
It has come to the attention of Full Lotus that defects in the zipper that holds the hull cap to the float shell can lead to failure of the zipper and sudden separation of the hullcap. It is imperative that you thoroughly inspect the entire length of the hull cap zippers for defects.
Defects are defined as follows:
SAFETY BACK-UP
For a time, Full Lotus supplied a kit to provide a secondary means of keeping the hull cap attached to the float in the event of a zipper failure. While this kit is no longer available, the materials and related installation procedure (see below) still apply: This is a mandatory, permanent, modification that must be carried out on all affected (pre-1999) Full-Lotus floats before further flight.
Full Lotus considers the modification to be a safety back-up only. You must replace the hull cap zipper if you find any defects, even after the safety back-up has been installed.
NOTES ON ZIPPER HANDLING
PARTS SUPPLIED: 60’ black nylon cord, Soldering iron
DESCRIPTION
The back-up is simply several sections of nylon cord that tie the hull cap to the shell through the edge trim. Its purpose is to retain the hull cap in the event of a zipper failure. The approximate time required for the modification is 3 hours per float.
The back-up cords are permanent installations for all existing Full Lotus floats. The cords bust be reinstalled each time the hull cap is removed for inspection or servicing.
INSTALLATION PROCEDURE
Please refer to the attached illustrations
1. Raise the aircraft and support it so that you may freely access the bottom of the floats
2. Using a light color chalk or pencil crayon, mark the float shell and hull cap trim at 4" intervals all the way around. (See fig. 1 below)
3. Deflate the bladders
4. Remove the hull caps from the floats
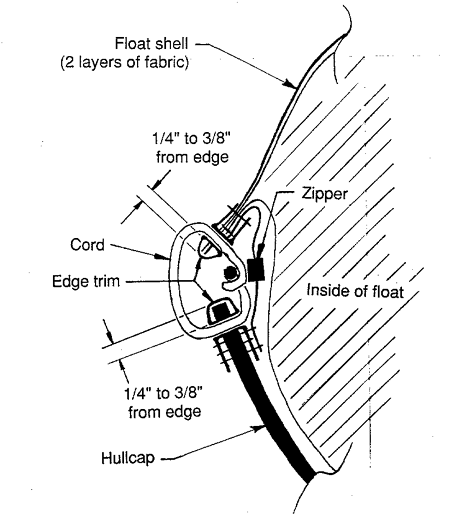
5. Using a soldering iron with a pointed tip, burn holes through the hull caps at the chalk marks, at a distance of ¼" to 3/8" from the outside of the edge trim. The holes should be just large enough to allow the cord (supplied) to pass through. (See fig. 2 below)
Caution: Be very careful not to burn the zipper with the hot iron
6. Burn holes through the edge trim on the float shells at the corresponding marks, again at a distance of ¼" to 3/8" from the outside edge. Try to avoid burning the sewn threads – it may compromise the strength of the seam. (See fig. 2 below)
7. Zip the hullcap back on to the float
8. Tie the hull cap to the float shell using the cord provided:
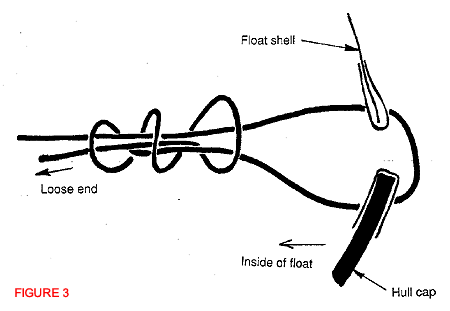
a. Begin lacing the hull cap to the float shell at the front middle. (See fig. 3 below) - Starting knot. To make it easier to thread, gently melt ½" of the end of the cord with a match or torch.
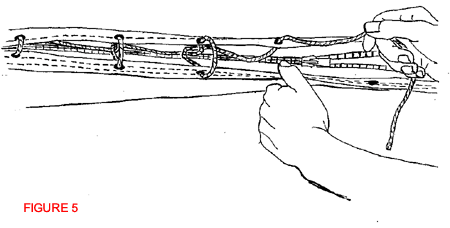
b. Lace the cord back towards the step as shown in figure .5 (See fig. 5 below). Loop the cord back through each stitch so that you tighten it firmly as you pull on the free end. The cord between each stitch should be hidden by the edge trim
c. Secure the cord at every fourth stitch with a simple half-hitch knot
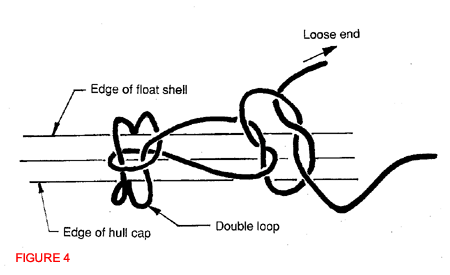
d. At the mid way point on the hull cap, cut the cord and make a finishing knot. (See fig. 4 below)
e. Make another starting knot and finish the stitching for that side in the same manner as above. The finishing knot should be close to the float step
f. Stitch up the other side of the float in the described manner. When you are done, you will have four independent sections of cord tying the hull cap to the shell
g. Using a lighter or a match, burn the loose ends of the cords to keep them from unravelling
9. Re-inflate the floats and inspect the cords and knots for security.
Fig. 1: Stitch spacing (side view)
Issued: November 20, 1998 - (Does not affect floats manufactured after 1998)
Models affected: All
Topic: Hull cap zipper safety back-up
INTRODUCTION
It has come to the attention of Full Lotus that defects in the zipper that holds the hull cap to the float shell can lead to failure of the zipper and sudden separation of the hullcap. It is imperative that you thoroughly inspect the entire length of the hull cap zippers for defects.
Defects are defined as follows:
- One or more missing teeth
- Broken or cracked teeth
- Loose or dislocated teeth
- Torn zipper webbing
- Separating teeth where there are no visible defects
SAFETY BACK-UP
For a time, Full Lotus supplied a kit to provide a secondary means of keeping the hull cap attached to the float in the event of a zipper failure. While this kit is no longer available, the materials and related installation procedure (see below) still apply: This is a mandatory, permanent, modification that must be carried out on all affected (pre-1999) Full-Lotus floats before further flight.
Full Lotus considers the modification to be a safety back-up only. You must replace the hull cap zipper if you find any defects, even after the safety back-up has been installed.
NOTES ON ZIPPER HANDLING
- When closing zippers, avoid using undue force – it is possible to break the zipper teeth if you pull on the slider too hard. Carefully align the zipper halves as you close the zipper
- Never remove or install the hull caps with the float bladders inflated
- Inspect the zipper thoroughly at least once per flying season
- Have the zipper replaced if you find any defects.
PARTS SUPPLIED: 60’ black nylon cord, Soldering iron
DESCRIPTION
The back-up is simply several sections of nylon cord that tie the hull cap to the shell through the edge trim. Its purpose is to retain the hull cap in the event of a zipper failure. The approximate time required for the modification is 3 hours per float.
The back-up cords are permanent installations for all existing Full Lotus floats. The cords bust be reinstalled each time the hull cap is removed for inspection or servicing.
INSTALLATION PROCEDURE
Please refer to the attached illustrations
1. Raise the aircraft and support it so that you may freely access the bottom of the floats
2. Using a light color chalk or pencil crayon, mark the float shell and hull cap trim at 4" intervals all the way around. (See fig. 1 below)
3. Deflate the bladders
4. Remove the hull caps from the floats
5. Using a soldering iron with a pointed tip, burn holes through the hull caps at the chalk marks, at a distance of ¼" to 3/8" from the outside of the edge trim. The holes should be just large enough to allow the cord (supplied) to pass through. (See fig. 2 below)
Caution: Be very careful not to burn the zipper with the hot iron
6. Burn holes through the edge trim on the float shells at the corresponding marks, again at a distance of ¼" to 3/8" from the outside edge. Try to avoid burning the sewn threads – it may compromise the strength of the seam. (See fig. 2 below)
7. Zip the hullcap back on to the float
8. Tie the hull cap to the float shell using the cord provided:
a. Begin lacing the hull cap to the float shell at the front middle. (See fig. 3 below) - Starting knot. To make it easier to thread, gently melt ½" of the end of the cord with a match or torch.
b. Lace the cord back towards the step as shown in figure .5 (See fig. 5 below). Loop the cord back through each stitch so that you tighten it firmly as you pull on the free end. The cord between each stitch should be hidden by the edge trim
c. Secure the cord at every fourth stitch with a simple half-hitch knot
d. At the mid way point on the hull cap, cut the cord and make a finishing knot. (See fig. 4 below)
e. Make another starting knot and finish the stitching for that side in the same manner as above. The finishing knot should be close to the float step
f. Stitch up the other side of the float in the described manner. When you are done, you will have four independent sections of cord tying the hull cap to the shell
g. Using a lighter or a match, burn the loose ends of the cords to keep them from unravelling
9. Re-inflate the floats and inspect the cords and knots for security.
Fig. 1: Stitch spacing (side view)
Fig. 2: Cross section of completed back-up stitching (looking down the float)
Fig. 3: Start knot
Fig. 5: Tying the hullcap to the float shell
Product Bulletin 1: Full Lotus Floats with SACS* - 09/01/1995
Issued: September 1, 1995 - (Does not affect floats manufactured after 1995)
Click here for the document.
Issued: September 1, 1995 - (Does not affect floats manufactured after 1995)
Click here for the document.


